Tuesday, January 31, 2012

Tutorial Tuesday - Coffee Filter Wreaths

This isn't a hard project (in my opinion) but I was surprised at how long it took. My wreath and tutorial differ from most because I pin it instead of just hot gluing it in.  Also, hopefully you can learn from my blood, sweat and tears what not to do.  (ok, not quite that much, but it felt like it at times) 

Here we go! Obviously, you need a wreath form (I did the green vs the white round ones because the styrofoam is easier to push into) and I started with these floral pins, but quickly switched to regular straight pins to save my poor fingers.  Plus they are cheaper than the floral pins.  However, the floral pins obviously give better hold, so a thimble might elliminate the sore finger issue.

You need to fold the coffee filters.  I only did one at a time, but perhaps two at a time would give a different look. 


Half, quarter, sixth (I think) Just fold halves three times.

Then its time to start pinning!

You can fold a bunch, or do them one at a time.  I alternated between the two methods as my mood suited me.


I pinned in quite a few before I began fluffing them.  I tried not fluffing to see if that step could be skipped as a time saver, but if it were a wreath I was putting on my wall, I would prefer them fluffed.

See what I mean? Fluffing makes them look fuller and less coffee filter like.  And when the wreath is done, you'll be really glad you took the time to complete this step.


It's hard to say how long it took me to finish the first third of the wreath, since I'm never full time crafter.  But if I had to guess I would say roughly an hour - hour and a half.  At this point, you're fingers will hurt, you might even be board with the entire process.  My little sister suggested I stop here and be done with it. "call those flowers or something" but in all fairness she was trying to get me to help her scrapbook.


Two-thirds done.  This is where I started shaping the wreath.  I decided not to wait to the end because I've been known to get carried away with my shearing.  So I just started to trim them all to the overall same lengths and worried about the exact shape later.  Also, you will now probably think that you are so close to the end based on the green to white ratio.  However, that would be very misleading. I would say I had at least another hour + left to go at this point.

NOW you are almost done! :) When I got to the place where the two directions met each other I started fluffing them before I pinned them instead of after like I had been doing. 
Here is the wreath finished being pinned.  You can see it still needs to be shaped (by the cetner) and also trimmed a little bit more to keep the edges more even.

Now you have some choices.  You can leave it and call it good.  Great wreath as is.  Or you can color it with inks. You could add some embellishments.  Or you can do like I did and add a simple ribbon.


Hubs picked out Red ribbon which just looked to christmas like for me.  I wanted yellow, but didn't have any.  So, pink it is! Which I think works perfectly. 


ta-da! (See more pics on my etsy.)
So go ahead, give this one a try!

Monday, January 30, 2012

Valentine Free Fonts

Since I didn't add any free fonts to My Valentine Freebie List, I decided to make a list of my top 5 free Valentine Fonts.  They are all free to download, however, I think it should be said that some of them ask for a donation/fee for commercial use. So, download away friends - these are to great not to use right away!  

Cupid de Locke Font
Download above font here


Look at ALL THOSE HEARTS! Download them here!

Janda Swirly Twirly
This one will be going on a scrapbook page soon! Get it!

font

Ignore the name, scroll toward the bottom of the page, and just click the image you see above.


No tidy way to show off this big font called Heartland. But it is pretty great! You can find it here.

Saturday, January 28, 2012

The Best Ideas

While doing what I (probably) do best, parusing the internet, I got a little side tracked.  And like always, I have no idea what I was originally looking for when I ended up where I did.  It's borderline frightening sometimes!  I used to have my staple places I went to for inspiration and tips or ideas.  And I realized, I'd been so busy with my new crazy life lately, I can't remember the last time I checked.  So it was pretty awesome when I ended back up on the Crafting Mother herself's site.

Of course I mean Martha Stewart.  Jail suit or not, this chick knows how to do things with other things my brain can not even accept.  But every now and then she has something even the average bear like me can do.  I accidentally ran into one such project...or so I thought.  I have always like things in nature.  And I love when you can take something in nature and make it into something really amazing.  Like Martha's Pussy Willow Wreath.
Gorgeous right?  And it's mostly just gluing.  So even my 6 year old should be able to handle that right?! So I set out to my local craft stores to get the supplies.  Wreath base - check.  Pretty ribbon - check.  Lots of glue choices so I can decide if I outsmarted Martha - check.  Now I don't have any pussy willow branches with hundreds of little pod thingys laying around, so I thought I should buy those too. 

I got to the section where they should have hundreds of branches, but they didn't have that many.  They had 3 bundles.  And each buddle had like 2 1/2 branches.  And they contained a total of approximately 36 pods.  Ugh.  The icing on the disasterous cake, they were on SALE for something like 7.99.  Honestly, I don't remember if that was their actual price or sale price, but who cares!!

So, while Martha's creation is unique and beautiful, it is not very realistic for this wreath making chick.  Not for a loooong time anyway.  Sometimes, the best ideas really aren't right in front of you. 

If you have hundreds of pussy willow pod thingys laying around and you want to try Martha's wreath, here's the instructions.  If you have hundreds of pussy willow pod thingys laying around and want to give them away, let me know!


Wednesday, January 25, 2012

Valentine (mostly free) Fun

Valentine's Day is not far off.  Pinterest is has been bombarded with pretty pictures and stuff. I don't know if love is in the air or not. Blogs everywhere are filled with lists of favorite Valentine froufrou.  If you really know me personally, then you know that I am a compulsive list maker.  So it would only be natural if I too made a list of valentine loves.

Some are quick.  Some are easy. Some are even free.  So here it is:

  • A clifford valentine.  Print it out already colored or in black and white to color - these are pretty darn cute!
  • A simple valentine word find print out
  • Really sweet "rose" bouquet made with Hershey Kisses (It says "not edible" but I'm pretty sure I would!)
  • What valentine list wouldn't be complete without a mailbox?
This one is pretty non-traditional, but I think it'd also be adorable in bright pink!
  • A Crochet pattern for a heart.  The website also has several reader suggestions for how you could use the heart.  But I think it'd make a cute dishcloth!
  • A free E Card for valentine's day! :) There is even one that say's "I freaking love you!" --I've actually said that before! :) You can email these or post them to facebook.  Which is great!
So there you are, my top 5 (Apparently that's all the longer my lists are these days...) favorite 2012 Valentine's Days Freebies! Enjoy, and happy pre valentine's day!


Monday, January 23, 2012

My favorite (kitchen) products!

As much as I love my craft room and being productive there, I equally love my  kitchen. So I'm going to go a different direction today and show you my other favorite room. The house fire that my family experienced last year was another lesson in finding the silver lining, the blessing in everything before us.  Well, one of those blessings was the kitchen I've only dreamed about.  And not only is it my dream, but it's also functional for us if either of us is in a wheelchair again.

My kitchen is not fully stocked yet, but its not to bad.  I have many favorite kitchen products obviously, but I will keep this list to my top 5.  This will be harder than you think for this girl! Let's get started before I start second guessing my list!

First on the list is actually first and second.  And it's a necessity.  (see how efficient I am?!) Number one is the Range and Number two is the microwave/range hood.


A TON of thought went into this purchase.  More than your average bear I think.  First of all,  I already knew I wanted the smooth top vs. the coils.  Due to the little ones, I knew the knobs MUST be on the back against the wall, not on the front above the oven like most units.  My third requirement was it needed to be a double oven.  I use the oven almost every day, and there are so many times when I need two ovens.  I often bake two things that need different temps, or I only need part of the oven instead of the whole thing.  And why waste energy? Lastly, I thought I needed black. I like stainless steel appliances but I don't like the upkeep they require (for this stage of my life)and the cost on the unit I wanted was way out of our price range.  Because God is awesome, I found the unit above! I suppose I should mention its a whirlpool although I could not tell you what model :( Sorry! When it comes to my appliances, that's not so important to me!

The second thing is the microwave range hood.  I knew I wanted an above range microwave.  This is an inside wall in our house.  So we originally thought we would need one that just recirculates the air instead of venting it outside.  When the house was gutted we could have had this changed and had a vent added.  However, if we did that we would need to make some changes (aka sacrifices) that we were not willing to give up.  So back to the original one.  Again, I wanted a black one so they matched (My things MUST match...its an illness) And the whirlpool Gold was the perfect solution.  It has my favorite buttons, like popcorn and reheating plates along with the must - baked potatoes.  But this microwave takes it a step further.  It comes with a removable rack so you can cook twice as much stuff at once.  No more waiting to use the microwave.  And it also has a really cool melt/soften butter button which I love! Check it out further here  (I would also accept it's "lower" version for less money)

My third favorite thing is pretty common these days, but in my opinion, still a must - the Kitchen Aid Mixer.  I use it for EVERYTHING.  My favorite attachment is honestly the flour shield.  Its so simple but so practical and while it doesn't do a perfect job, it does a good job.  What color is mine? Well it was either this or white since that's all Kohls stocks (I saved 180.00 on mine using coupons, Kohls card and kohls cash! :)
But since my kitchen themes is red, white & blue, it worked out just fine!

Fourth on the list in a huge luxury item, but I never want to leave my kitchen now!! :) I got an under cabinet TV that is also a dvd player, radio, and bunch of other stuff I don't use.  I did a lot of research and I decided that the best bang for my buck was this one from Amazon.  I am happy with the product,  but if I sit at my  breakfast bar I do have to squint a little to see it clearly, so if I had it to do again, I would pay the extra for the larger screen. Either way, still a great purchase!


Now, the last item on my list was a tie.  It was either my tupperware containers with blue seal, or the pampered chef Ultimate Mandolin.  Since I don't have my pampered chef stuff replaced yet - a party is on the to do list - and I keep my tupperware containers on my counter, I have to give the win to them.  I don't necessarily use them every day, but when I do use them I never have to worry about whats inside.  No bugs (ick!) no air  "leaks" which means whats inside is always fresh and ready to go.  I suppose I should mention I use mine for my flour, sugar, brown sugar and powdered sugar, respectively. 


So there you have it - my favorite top 5 kitchen items (currently in my kitchen! ha!) And honestly, the only thing I would add would be my pampered chef stuff. I hope you enjoyed  this break from the crafty life. 

PS -  if you want to see my whole kitchen, I will be posting those pics on my personal blog sometime soon.  http://inmytoday.blogspot.com/

Friday, January 20, 2012

Amazing Custom Duvet Cover from Jen

I had something in mind today for a post.  But then I got on Pinterest.  And I honestly don't even remember what I was going to blog about.  I came across a pic I just couldn't ignore.  I eventually found the original post.  And I couldn't help but share it with you because it is simply amazing.


Photobucket
Click the picture to get to the tutorial
 
It's a duvet cover.  A custom duvet cover.  The drawings are by her son. Her blog post explains it very clearly and very well.  It was a very time consuming process (in my opinion) but it turned out so amazing,  I think it's worth it.  I think another fun addition would be to find some colored fabric markers and let the little artist color them in.  (depending on the age of the child obviously)

And if you didn't want a duvet cover for a bed,  I think transforming this into a blanket would be quite easy as well.  You could add fleece to the back of it or some cotton and some batting and make it like a quilt.  Again, more time, but I think that would be awesome! In fact, I think I will wait until all of my kids are a little older, and then make one similar to this with drawings from all the kids and then make it into a family project.  The end product would be kept in the living room for all of us to enjoy and use to snuggle with.  THANK YOU JEN for sharing!

Thursday, January 19, 2012

In the eye of the beholder


The older I get, (eek!) the more I just somehow come to understand.  One of these things, is the fact that most everything is open to interpretation.  For example, I think my 3 year old has the cutest pigs (toes) I've ever seen.  Even when they are "stinky", I still cant get enough of them.  Now, you may not feel the same way. Such is true in the craft world as well.  I have found so truly bizarre things - in my opinion of course.

One of them is chick sweaters.  Not, hot girl sweaters, but rather baby chicken sweaters.  I dont know what else to say about this.  There is even a free pattern.  Go figure!
Just click the picture for the article AND free pattern :)
I used to collect Ty Beanie Babies as a kid.  In fact my sister and I were beyond obsessed with them.  Now, they are a dime a dozen (or so).  And there are creative uses for them popping up all over.  Creative = bizarre in this case. One of these examples is using them like a hunted animal.  That's right. They cut the head off the beanie and "mount" it.  Even more odd to me, they use the word cute to describe them.... You can search and see a few on Etsy, along with a few other toys I loved as a kid like the 80's My Little Ponies. (on a personal note - this isnt cool to me...almost a little sad??)  Another use, which I do not understand even a little is to mix and match their heads and bodies, like the once cute lion and the cardinal.  Bizarre, right?
Lion Cardinal

The last in my list of odditites tonight is this seeminly new idea called crafting with cat hair.  The idea is just what it sounds like.  Take your cats shedded hair and create something with it.  There is a book on Amazon that goes through the entire process where they show you how to make finger puppets and coin purses among other things.  Again, a quick etsy search gives you an iPhone cover and jewelry.  While I still cant get on board with the idea of wearing cat's shedded dead hair, this piece is still rather beautiful, if you can forget its made with dead hair from an animal.

TODAY SHOW feature SpirialedPuffs2 felted cat hair necklace

So I guess obivously these things prove that not only is everything in the eye of the beholder, but I guess one man's trash really is another man's treasure???


Tuesday, January 17, 2012

Who doesn't love free??

Today I have to talk about Inkscape.  It's nothing new.  But it is free.  Inkscape, in short is a program mostly used for converting PDF and other files into SVG files.  I use Sure Cuts A Lot, (another AMAZING program, but that's far from free!) and I need SVG files for that program.  Ok, I realize this post wont interest everyone, but for those that use SCAL or Inkscape, maybe you'll find this helpful. (PS - anyone could download Inkscape.  Even if you don't have a "need" for it, it is a really fun graphics program to play around with)

My biggest issue was that I was not able to actually fully convert my files.  Sure you can open them up, and then you click 'save as', change the file extension in the drop down menu, hit ok and BOOM you have an SVG file.  Wrong.  I would quickly learn that when I went to SCAL (Sure Cuts A Lot) and imported my new SVG file, all I got was a blank box. 

Now I'm no pro at this, in fact far from it.  So I doubt I will use the proper terminology.  But maybe that's good. I will just explain these things as best I know how.  For the example, I will use a basic sun I found online that I want to cut out with my cricut later. 

First, obviously open up Inkscape. Click 'File' ~ 'Open' ~ (locate file on your hard drive) 'Open'.  I get a box that pops up that says: "Link or Embed image" and then explains the difference. I always chose embed.

At this point you will see your graphic on the page. You are just a few short clicks away from a finished SVG image you can use in SCAL or where ever you need it.  You need to select this image.  So simply click on it and a box with arrows around it will show up.


Next, you need to click on the 'Path' menu at the top of the screen.  Go down until you see 'trace bitmap....'


Ok, so third step.  The "Trace Bitmap" box will pop up.  It has a ton of options in it.  And I can't exactly tell you what they all mean. Until I figured this out, I scoured the web for tutorials.  I'm not great with You Tube videos, (and honestly I don't always trust them anyway) and I found this tutorial.  It's not great, but it's how MY tutorial here was born! :)


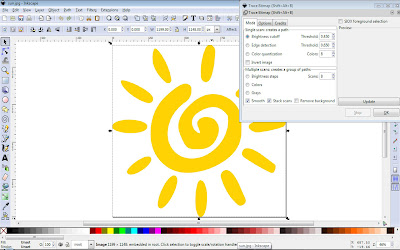
Like I said, I just had to play around with these options.  One site I checked out first said to just keep hitting 'update' until your image shows up in the box.  Don't do that. You'll be clicking until your computer dies and nothing will ever show up there.  I say if after two or three clicks max, nothing has changed, you need to start trying different combos of the options.  For this example, the one that ended up working for me was to select 'edge detection'  I tried changing the threshold numbers, but the changes it made were not substantial enough for me to decide it mattered. So click 'edge detection' ~ 'update'.  Your image should show up in a black and white outline, like you see below.


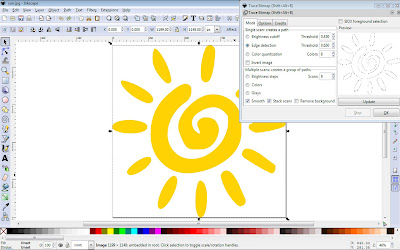
If you wanted to copy the image in color, you need to select 'Colors' on the bottom set of options.  The "paths" is set to a default of 8.  I have not yet played around with the different paths so I have not changed this number yet.  I suspect it will be similar to Photoshop and layers. Whenever you change something, like going from black and white outline, to a full on color image, you need to hit update.

After deciding which one you want, click 'Ok'.  For the remainder of this tutorial, I will proceed with only black and white.  (Reason being, if you cut this out on a cricut or silhouette, you would chose the color with your paper - you could have a hot pink sun.  And the image is easier to work with in my opinion, in black and white.)

Once you click ok, the box does not disappear. But you should notice that your image has a darker outline around it. 


Now you can click the red X in the upper right hand corner of the 'trace bitmap' box.  You have to drag your new outline off of the color image for the next part.


Go back and select the colored image now. Once the box is around the color sun, hit delete.  Move your black and white image back to the "page".


Last step! Click 'file' ~ 'save as' Make sure the drop down menu says "Inkscape SVG (*svg)". Rename the file to whatever you want, double check that you know where you are saving it to (I always use desktop for fast finding) and click ok.  That's it! Now you can import your SVG file to SCAL or use it however you need to.

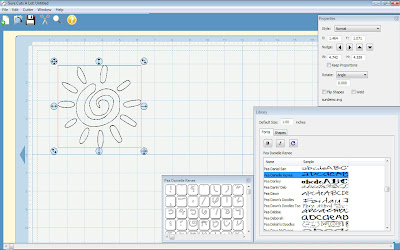
Here is my image imported (and cut-able!) in SCAL.  (I have v.1)


There you have it, easy peasy lemon squeezy. Now go download Inkscape and try it out for yourself. Even if you don't have a place to use an SVG file just yet. 


What do you need?

I am very lucky. For many reasons.  But for the sake of this post, I am lucky because I have a small den like area at the far side of my craft room.  Of course it has my DVR hooked up to it so I am able to catch up on my shows. (I rarely watch anything live anymore.  Who knew how much of my time was being wasted on commercials!)

I guess I never realized it before tonight.  I received an "emergency" order from etsy over the weekend for a birthday board.  AKA an order that the buyer requested in a shorter amount of time than what I normally quote it would take to finish.  This weekend was rather busy with family stuff so I didn't down to work on it as much as I wanted. 


This is a birthday board - available on my etsy.

Now I have had the TV in my craft room since I've had the craft room.  (All thanks to the hubs keeping every tv that we have ever owned and the craft room was practically the only room that didn't have an old TV in it yet!) I watch a lot of shows. Criminals minds, Friends reruns (I could watch them all day!), the Good Wife, all the CSIs, the Mentalist, Bachelor, Who's Still Standing?, The Biggest Loser, Fear Factor (THANK YOU NBC!) and of course the soaps! :)

Tonight as I sat down feeling very unmotivated, I flipped on the TV and went to the DVR menu as I always do.  I scrolled through the list not knowing what to pick.  I decided that I needed to be productive so I shouldn't pick anything with a plot or storyline I had to follow.  That narrows it down.  I still lump the soaps into the remaining list because lets face it, sometimes you can miss months and still know exactly who is off in some exotic land managing their self built multi billion dollar corporation. 

But I wasn't in a very soap opera kind of mood, so enter reality TV.  And I decided tonight was a catching up on the Bachelor night. I thought about Fear Factor since I've been dying to see it and I don't really enjoy watching that with the kids. But I got thinking about it, I can only watch certain shows during certain tasks.

When I am home alone, I sometimes plug in the iPod. But other times, I rely on the TV. Like when I'm doing something at the general craft area, I have to "watch" something a little less involved - like the bachelor, no offense ABC.  But if I'm sewing, it has to be a soap - because the machine is so loud I have to be able to miss some of it and still know what is going on. And if I'm crocheting, I prefer it to be a comedy. When I'm doing candles, crayons or something at that table, it has to be a drama, like the good wife, because there is (sort of) a lot of down time for those projects. When I am scrapbooking its two things.  If I'm in a groove and I'm rolling pages out left and right, then I let the kids pick something.  Because I dont actually watch it, I just need the noise on in the background of my thoughts.  (is that weird?) But if I am feeling some creative block, then I need to have one of my dramas on.  Not sure why, but then I work during the commercials or the boring parts.  Again, I am sure this is weird. 

So I'm curious.  Do you watch a certain show while you are working? Or do you listen to a certain kind of music maybe? Or are you one of the few (I think) who gets to enjoy the quiet?

Friday, January 13, 2012

Pay it forward people!!

Can I have $25.00? I doubt if I just walked up to you and asked you'd willingly hand it over, you would.  But if after you read this, you don't feel that you could skip buying the next round with your buddies, or put off that new pair of shoes for just a bit longer, than I won't be mad.  But, if you could donate the money (or more) you'd be doing much more than make me happy.

Most of you have probably heard me talk at some point about Nick & Friends Sarcoma Foundation.  I have a page dedicated to them on my website for the shop (just click on their tab at the top).   And I've talked about them on my caringbridge pages from time to time I'm sure.  I also helped raise some funds for them via facebook apps by donating my birthday.  And if you know me, you also know that paying it forward is one of the most important things to me.

Well, folks we are faced with another golden opportunity here. To do what we always say we will - pay it forward. My very favorite charity is in need.  They have lost both computers they use for the foundation.  I don't have to explain how crucial having these computers are to furthering their cause.  They are a small charity that is family run and they give all the money raised to research and helping families with various financial needs.  So, there is no money in the account to replace these two computers.

Nick & Friends did a lot for me when I was in the hospital.  They personally listened to my fears and complaints, and offered a shoulder to cry on, any time. They've connected me to other people with my cancer.  They sent gift cards to Jeremiah for gas and food while I was sick.  Maybe most importantly to me, they have kept, and still keep, my kids in their hearts.  They have sent care packages to the kids and still include them in the Angel Tree and Christmas. 

Andrea and Clyde, along with their boys (they founded the charity) have touched my hearts in more ways than one.  And I personally know the world needs them to continue their work.  That means they need these computers. I would like to raise at least $1,000.  For that to happen, I need forty people to donate at least $25.00.  Now, I am going to be the first one, so I need to find 39 other big-hearted-happy-pay-it-forward people.  Will you be one of them? I hope so. I really do.  Click the link below, its fast & secure.

https://www.justgive.org/nonprofits/donate.jsp?ein=26-4447529&amount=25&isRecurring=true

Thursday, January 12, 2012

Egg Carton Creations

I intentionally save egg cartons. But as I started looking around my craft room I noticed I have four 18-egg cartons.  I knew I was going to do something fun with them, but I didn't have an exact plan yet.  Naturally I was thinking something to do with a wreath since that's kinda my forte, if I actually have one.  I thought for your reading pleasure I would put together some other ideas you could use your egg cartons for.


Of course there are the obvious things like the little caterpillars every kid in America seems to make, or save them for garage organization - nuts, bolts, screws, etc.  Or you could cut the top off and put in in a drawer for small part separation - earrings, bracelets, broaches, and the like. You could also use them for change storage for your garage sale, although I'm not a huge fan of that one.  Some people use the foam ones for ice cube trays on the fly before a big hoop-la, but I think those would be some pretty large cubes. 

You can use them for the ever popular seedling starting (I intend to try this every year, but always forget to do it early enough) Another fun idea would be to cut the cups apart and use string to make a bucket; fill it with bird seed and hang it in the trees.  One of the ones I like the best is to use it for shipping things. duh! Sometimes I miss the most obvious!

And of course you could dress it up with some scrapbook scraps and use it as a very cheap but efficient and pretty embellishment organizer.  Likewise, you can use them at your sewing station for treads, stray bobbins and extra buttons.

While, these are all egg-cellent  (I couldn't do it), excellent ideas, my favorite thing to do with them is to give them to the kids.  I keep a little stock pile of odds and ends; extra yarn, left over buttons, foam shapes, anything.  If the stock isn't growing very fast and the kids are getting antsy to hit up the craft box, a quick trip to the dollar store usually cures the fix.  Throw in the egg cartons and some glue and let them go wild! Let them lead with their imagination but guide them where they seek assistance.  Even if you can't envision what their end product is supposed to be,  I have no doubt you will love the memories.  Happy crafting!!!

Wednesday, January 11, 2012

More crochet help

As you bare with me while I niche out my blog and transform it to be something I love, (and hopefully you will too) I am kinda figuring this out as I go.  That being said I have been searching for the perfect project to do my own tutorial on.  And I've been drawing a huge blank.  This has been completely compounded by the fact that my house has been plagued with illness (on and off) since Christmas.  It has not been pleasant, but I will not go into detail.

At any rate, my apologies for missing yesterday.  My intent is to post something tutorial/teach-y every Tuesday.  But, yesterday did not go well.  So instead I will just share another amazing blog I found that continues that teaching the wonderful craft of crochet. Without further ado, I give you the Crochet School.

Announcement1


She has amazing crochet help here! Very well done! (Mine took a bit to load when I tested the link attached to the picture, so don't discourage...its worth the wait!)

So there you have it - another crochet tutorial WAY better than I could have come up with right now! Enjoy!

Monday, January 9, 2012

The Newest social media craze?

Do you follow my personal blog?  If you do, you heard me whine about a website down...it was down on and off all day.  Hence why this post is so delayed. :) The site was Pinterest.

If you are on facebook, chances are you've heard about pinterest.  My newest guilty pleasure.  I can easily waste more time here than on facebook.  Yeah.  I know, it's scary!  If you aren't on facebook and haven't heard of pinterest, you are missing out.  Now this probably appeals more to females than males, but just go with it here.  Pinterest is self described as "a virtual pinboard. Pinterest allows you to organize and share all the beautiful things you find on the web. You can browse pinboards created by other people to discover new things and get inspiration from people who share your interests."

Many people use it in place of their favorites list.  This is because you can post a picture, and back link it to the actual site.  So, when you are looking for that crochet tutorial or that home made play doh site or your next little black dress, all you have to do it click on the picture and walla!

To get started you will need to be invited.  Yes, Very elite! :) You can request one from pinterest directly, which may take weeks I'm told.  Or you can get an invite from someone you know who is already on pinterest. (You can comment below if you would like an invite from me!)

Much like the other social media sites, you can follow your friends boards.  You can follow people you know or people you don't know, but who share similar interests. Or, if you're like me, you can use it to continue to gain online exposure.  Of course, like facebook and the like, these backlinks are not yet deemed reliable and time will tell how google ranks these backlinks.

Another downfall, many have expressed the soon downfall of Pinterest due to those wonderful little spammers out there.  Supposedly, they'll  need to shut down the open link feature of Pinterest due to excessive spam.  Not sure how the site would survive that as that is basically the whole idea.  I'm sure there is a way around that, such as the codes other sites use.  But I am not techie at all! So I will leave that problem and solution up to the pros.

Anyway you cut it, right now [wait...is it working right now? ok.  Yeah, it is! :) ] this site is pretty fun! It isn't just filled with crafty jazz.  Tons of wedding ideas, recipes, gardening, and other household tips, among many other things! Even if you aren't a girl, I think you will have fun at least browsing the site. (which by the way, you do not need a log in just to look - only to interact!) And oh yeah, follow me on Pinterest! Now get over there and get Pinning!

Thursday, January 5, 2012

Missing the good ole' days

I recently started the dreaded task of going through the never ending boxes that seem to multiply while I sleep.  I found one that I had put a bunch of random stuff in from when I was pregnant with my first baby.  The best find was a nearly brand new skein of yarn.  We used it to play a game.  We passed it around with a scissors and then everyone had to cut the length they thought was my lovely circumference. Later, I used the longest piece(which was way to long!) as a border to one of her scrapbook pages. 

Anyway, the yarn is beautiful! Red Heart Super Saver Yarn Pinata E300-723.Red Heart Super Saver Yarn Pinata E300-723; 3 Items/Order

But of course it is discontinued.  Naturally, I looked on Ebay because "you can find anything there".  Except, Red Heart Super Saver Yarn Pinata E300-723.  And then I did a general google search which returned many of those generic sites, like shop.com or something strange I would never trust.  I found one craftish website that was selling them for 11.37 per skein plus shipping.  Yikes! I guess I will just keep looking or find a one skein project!

There are lots of things that are no more that really should be.  My grandma must have loved her Tupperware lady (and who doesn't!?) because we had all the usual Tupperware toys. Which are now referred to as "vintage". Ouch.  Some of my favorites were the the dishes, the stencils and busy blocks. Grandma must have thought we would eat the animals or something because I don't remember ever having those.
Tupperware Busy Blocks
We didn't have a lot of money growing up. But we still had the BEST time playing with what we had.  One of my and my sister's favorite things to play with were these child size houses my dad made us.  He had gotten some very large boxes. (like appliance boxes, but ours were from the local implement)


This isn't one of ours, but closely resembles it!
Of course we were free to color and draw and write whatever we wanted.  It was wonderful! Anyone who has kids or has seen kids know what a huge hit any box can be.  So imagine if they had a big one that looked like a house they designed!? Can't wait till the next time you buy a new washer or dryer? Hit up any of the appliance stores.  I know they have more than enough cardboard.  And I bet they wouldn't mind giving it away free! 

Tuesday, January 3, 2012

Tutorial Tuesday - Who wants to CROCHET??

Saying I love to crochet is a small understatement.  I learned to crochet from my mom when I was a very little girl.  She was always crocheting and I was always amazed and what a ball of string could be turned into.  Crocheting has gotten me through pregnancy, chemo and MANY waiting rooms!  Even as an adult, who's done it for many years, I am still learning. 

Since I take my crochet with me to so many places, I am frequently questioned.  So, for Tutorial Tuesday, I will keep it simple (and helpful!) Here is an AWESOME blog I stumbled upon today completely by accident.  She is working on a complete How-To-Crochet outline with links.  Very nice!

From Easy Makes Me Happy!

Of course you can do a google search for "learn to crochet" and in my opinion, be completely overwhelmed. There are also crochet forums, and classes you can take, usually offered through local craft stores.  (I believe Michaels in Rochester is starting one soon)

If you are more of a hands on, visual learner, like me, then this will quickly become your favorite book:

 This is the 1st Edition - this is the one I have and LOVE or there is now a second edition available.  (It has a different cover design)  You can get this book just about anywhere. I got mine at Barnes & Noble (with a coupon and my membership discount of course!) because I just couldn't wait for Amazon to ship it.  Don't be intimidated - this book WILL teach you how to crochet - even if you have NEVER done it before! Really!  It also has basic patterns and more resources in the back of the book, which I have not even got to yet.  I just can not say enough about this book.  It is really wonderful.  If you want to take a peek right now, check this out!

If after all this, you still feel its just not for you, but you really want those cute booties for the new baby, or a new throw for your bed, then head over to etsy.  With 415,721 items for crochet, just now, you will find what you are looking for!

Monday, January 2, 2012

MY FIRST POST! YAY!

I want/need to take my craft business to the next level.  Of course I have been reading some amazing books lately on how to do that.  And I feel a little silly admitting I never considered a blog to be a part of that business.  So, the Benike Boutique Blog is born. 

I thought a fitting first blog would be to give you all a peek into my work space.  So bare with me as I attempt to make an amazing "first blog post" :)

Ok! That wasn't so bad! This is my wreath work space.  Its always a work in progress.  On the left is a shelf I store wreath bases on and picks and other things that dont store well elsewhere.  Next is a hanging flower post.  This keeps it up off the ground away from kids and debris and other stuff.  Next are some ribbon racks I ordered from an awesome crafter - find them here

Ribbon Rack Close Up! :)
Moving down the wall....


Scrapbook Workspace.  A stamp/punch shelf I made MYSELF ancors the space.  And all the tools surround it; paper and sticker files from cropper hopper on the left, and a mish mosh of other office products turned scrapbook essentials on the right :)

Thats the main wall of my craft room.  I hope you like it as much as I do! So, now that you've seen mine, let me see yours! Look me up on facebook and/or comment below - thanks for reading!